What Meegan Makes

vintage style, cottage living, home cooking

  • Home
  • Contact for Collaborations
  • Privacy Policy and Disclosure
  • Furniture Makeovers
  • 10 DIY Seasonal Banners
  • 15 Creative Spring Crafts

15+ Painting Projects YOU Can Do with Christy

January 4, 2014 By Meegan 2 Comments

[slideshow_deploy id=’6144′]

Today we have a special treat with Christy from Our Southern Home!!  She has put together a round up of 15+ Furniture Painting Projects YOU Can Do.  I am so happy to share it with YOU today!  Take it away Christy…

I hope you have all been having a wonderful holiday season!

I am so enjoying a little break and spending time with my family just hanging out!

I am excited for the new year and beginning new projects in our home. Painting furniture and accessories is such a wonderful way to give new life to items that you are maybe not so excited about anymore. Or maybe you found that great side table at a yard sale, and you just need some inspiration! Enjoy and be inspired by 15+ Awesome Furniture Painting Projects You Can Do!

15+ Furniture Painting Projects You Can Do via Our Southern Home #chalkpaint #furniturepainting #thrifty

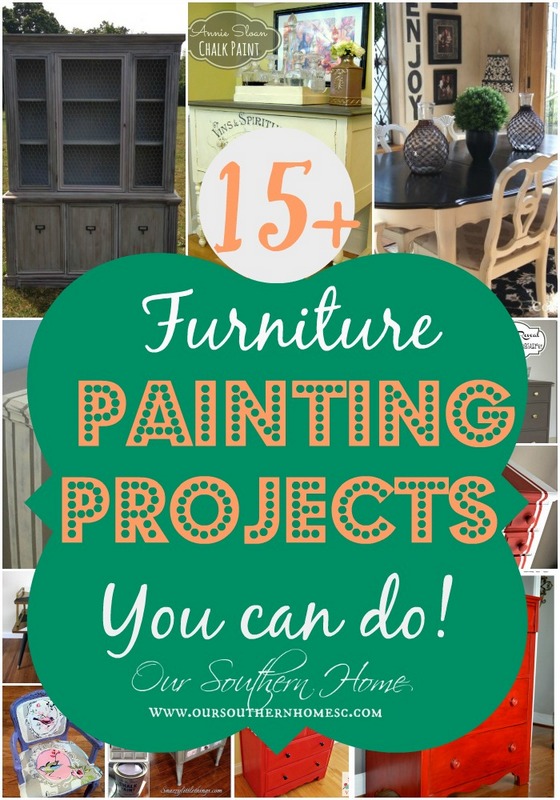
Here are 15+ Amazing Furniture Painting Projects!

grain-sack-desk

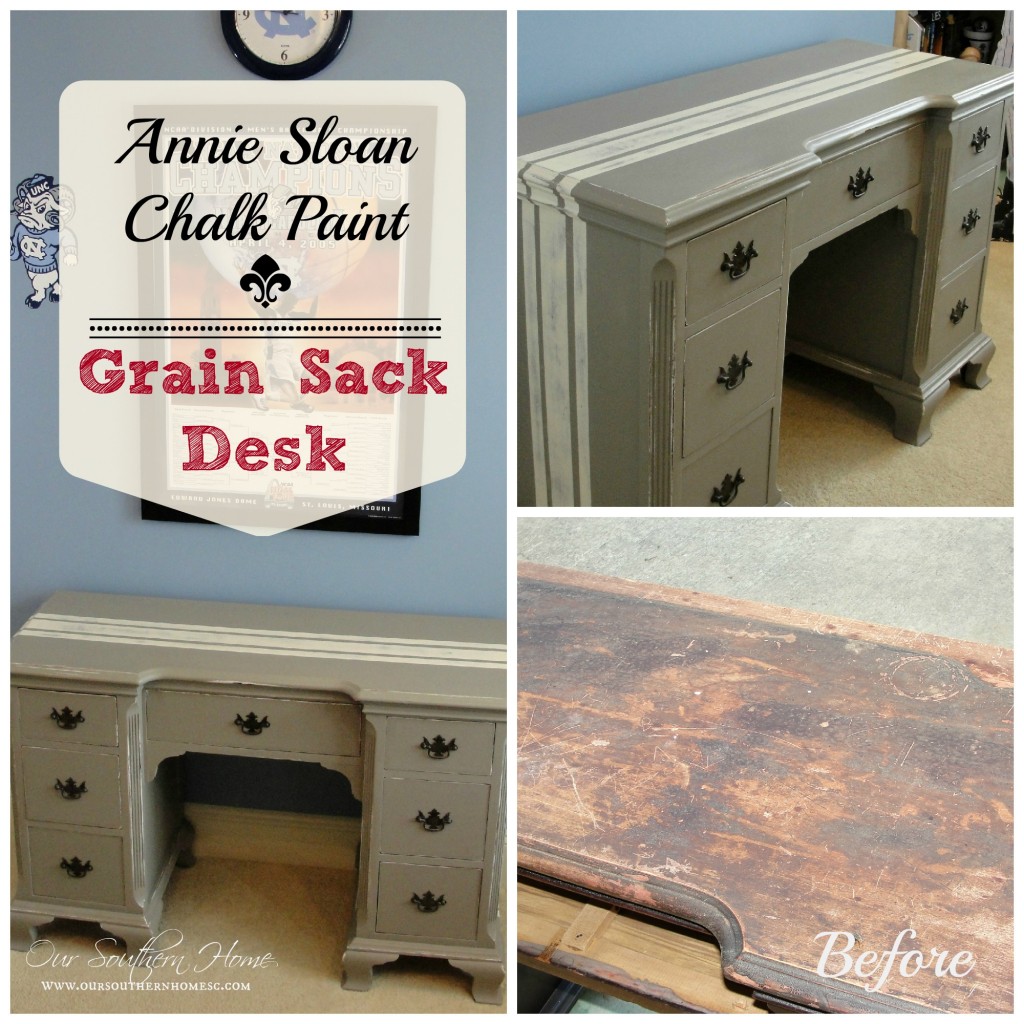
Let’s get started with one of my projects. My mom bought me this antique desk in really bad shape at a yard sale for $15. I used Annie Sloan Chalk Paint to revive it for my teen son’s room. You can find the complete how-to HERE from Our Southern Home.

Dresser- Emperors Silk-collage

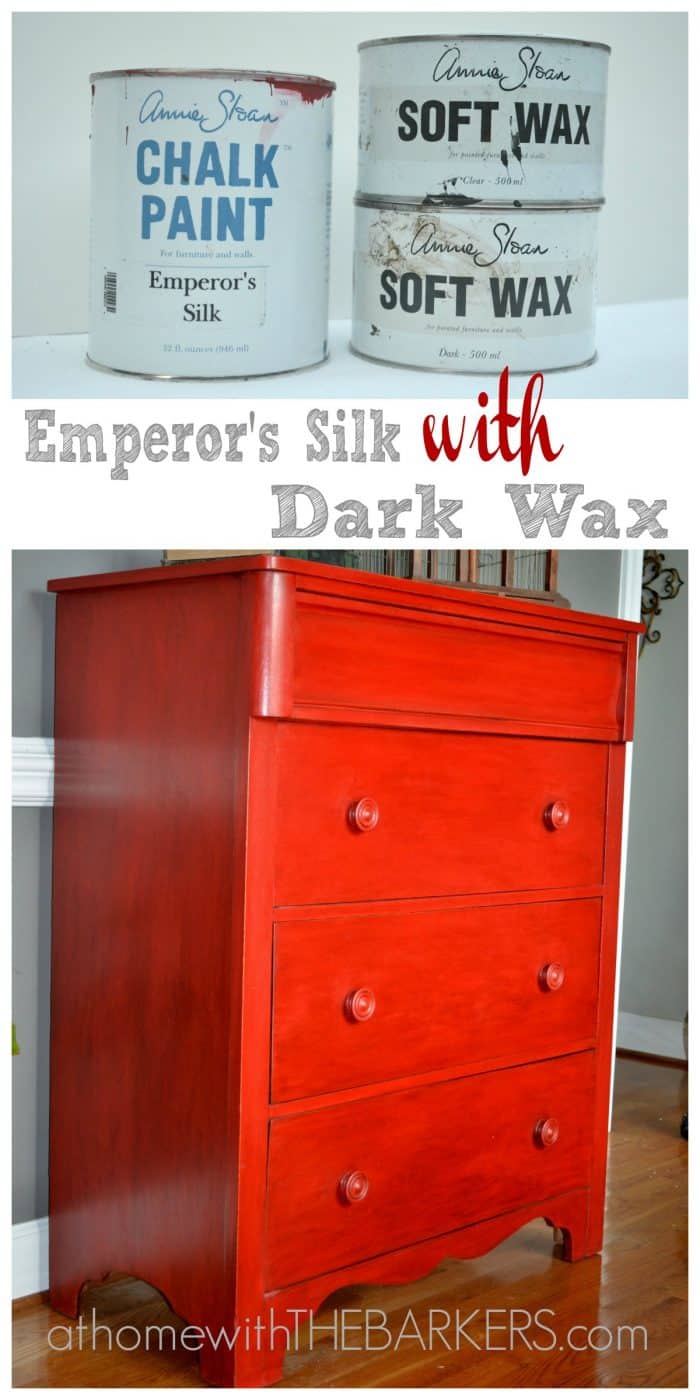
Emperor’s Silk Dresser with dark wax by Sonya from At Home with the Barkers creates a striking piece!

Brush stroke free finish

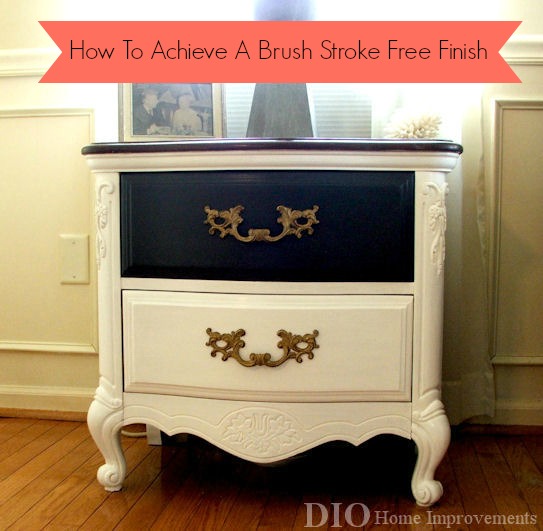
I know we are all interested in Dria’s post on How To Achieve a Brush Strokes Free Finish from Dio Home Improvements. Thanks, Dria!

Vintage Dresser

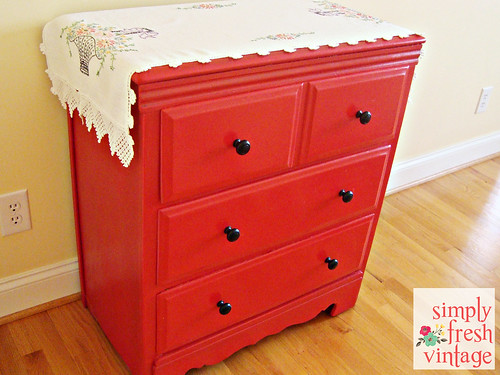
Lani from Simply Fresh Vintage has a tip involving White-Out that she used on this dresser! Why didn’t I think of it?!

20130902-180349.jpg

Paint and Mod-Podge rescue this Goodwill table from Jeanette over at Snazzy Little Things. 

Painting a Laminate Dining Table Emerald and Gold - Rappsody in Rooms

Yes, you can paint laminate! Megan from Rappsody in Rooms shares the how to! Her entire porch is full of thrifty do it yourself ideas!

Ballard Design Inspired Shutter Gray Hutch

Gorgeous redo from Beth over at Farm Fresh Vintage Finds! You won’t believe the before! Removing a few lower panels and replacing with bead board really updates this stunner!

white wash furniture details on a turquoise chest

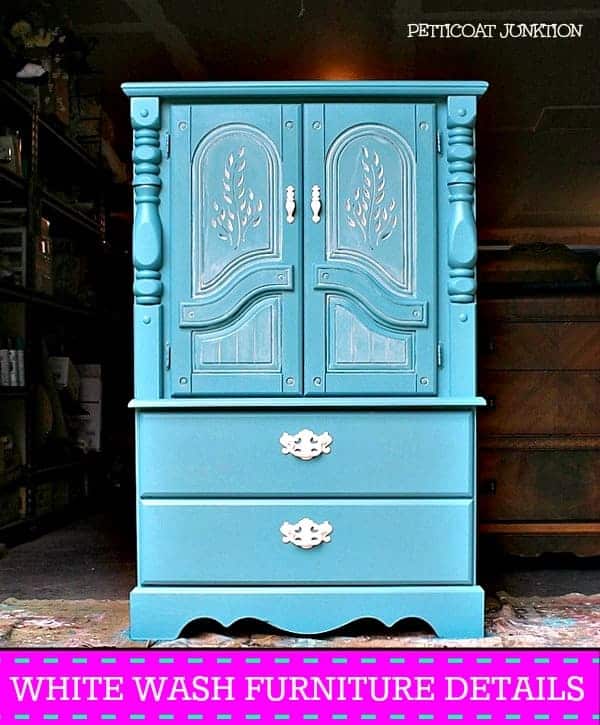
Beautiful piece from Petticoat Junktion. Kathy is fearless in her creativity! She is always generous in sharing her techniques with readers.

Dining Table Makeover

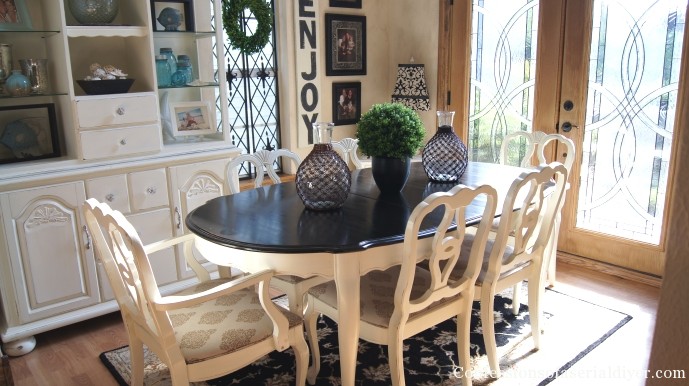
Are you sitting down? This dining set was $85! Visit Christy from Confessions of a Serial Do It Yourselfer for the details! The transformation is amazing!

Racing Stripes Dresser Update by Just a Girl and Her Blog

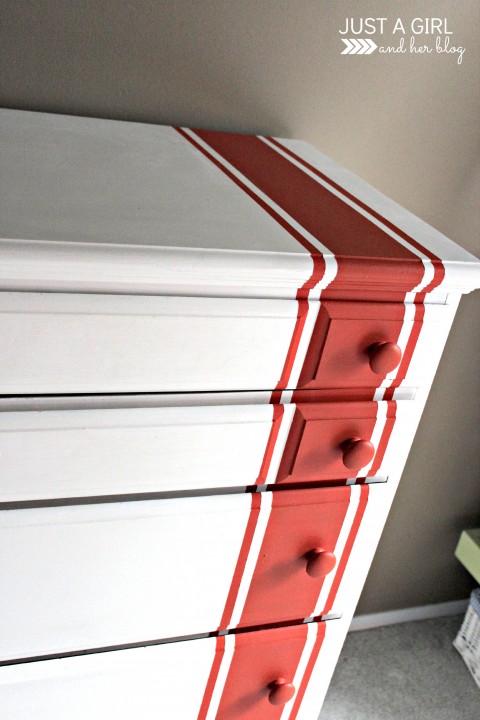
You can even update a piece with just stripes from Just a Girl and Her Blog! Abby adds grain sack stripes to an already painted chest for a quick update! Stripes are hot right now!

furniture makeover

Chateau Grey is my absolute favorite Annie Sloan Chalk paint color. Sharon from Mrs. Hines Class painted this old dresser, and it is now used as a media cabinet! Where is the “Love” button? 

Check out this whimsical beauty by Amanda from Mommy is Coo Coo. The fabric and color choice are such fun!!! I have a major crush on this chair!

Antique Sideboard Makeover - Chalk Paint-Graphics

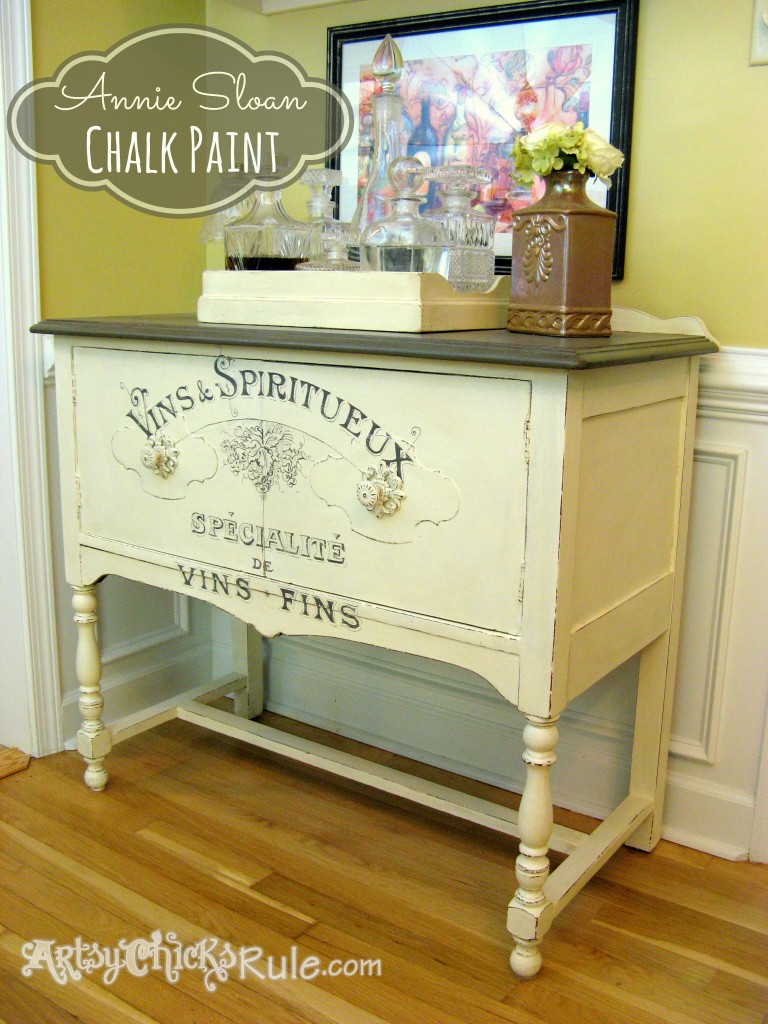
Nancy from Artsy Chicks Rule is such a talented furniture painter and artist. She makes adding topography to furniture look so easy. Guess what…it really is! Visit Nancy for all the details!

Trash to Treasure Dresser Reveal by virginiasweetpea.com

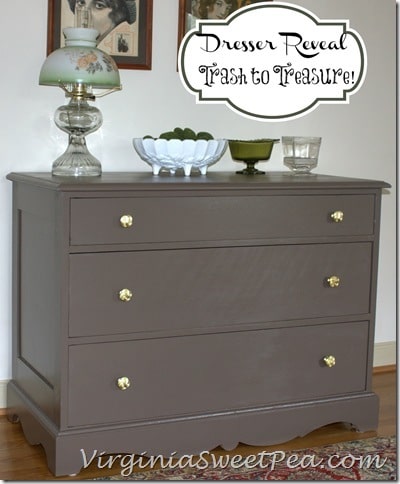
Beautifully painted furniture doesn’t have to just be painted in chalky paint brands. This is lovely finished in gloss from Lowe’s! Visit Paula from Sweet Pea for the color and details!

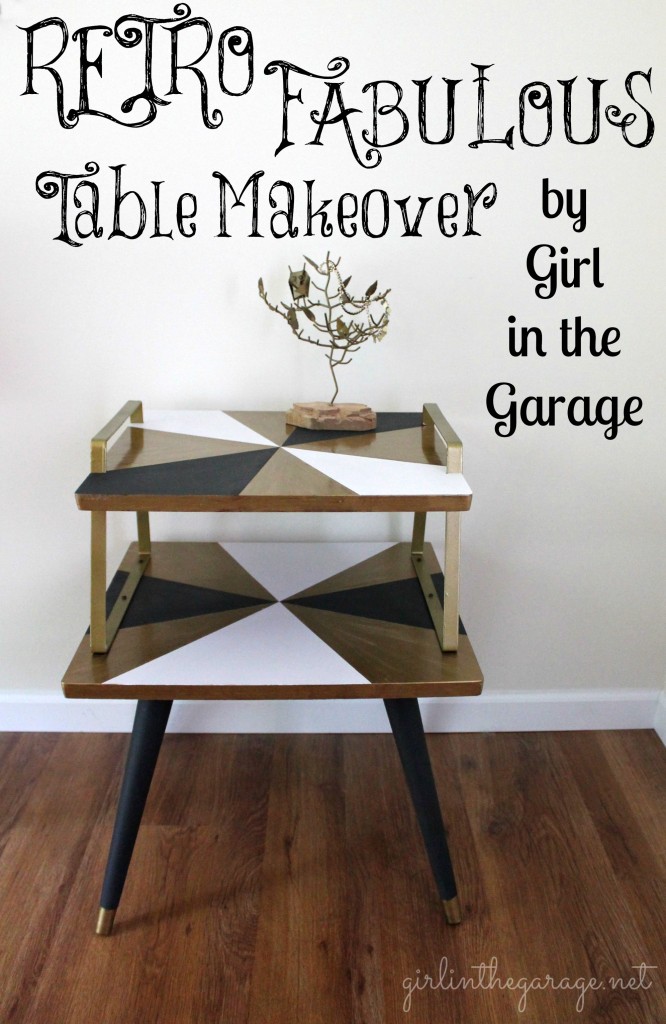
Loving this retro table.  Jen from Girl in the Garage has awesome tips for painting geometric designs on furniture! She does lots of furniture so be sure to click around on her blog!


This piece by Pamela From My Front Porch To Yours shows that you shouldn’t look over a badly damaged piece. This water damaged secretary is painted with not one, but two chalk paint colors. The inside is left stained! 

Vintage Chair Makeover2.jpg

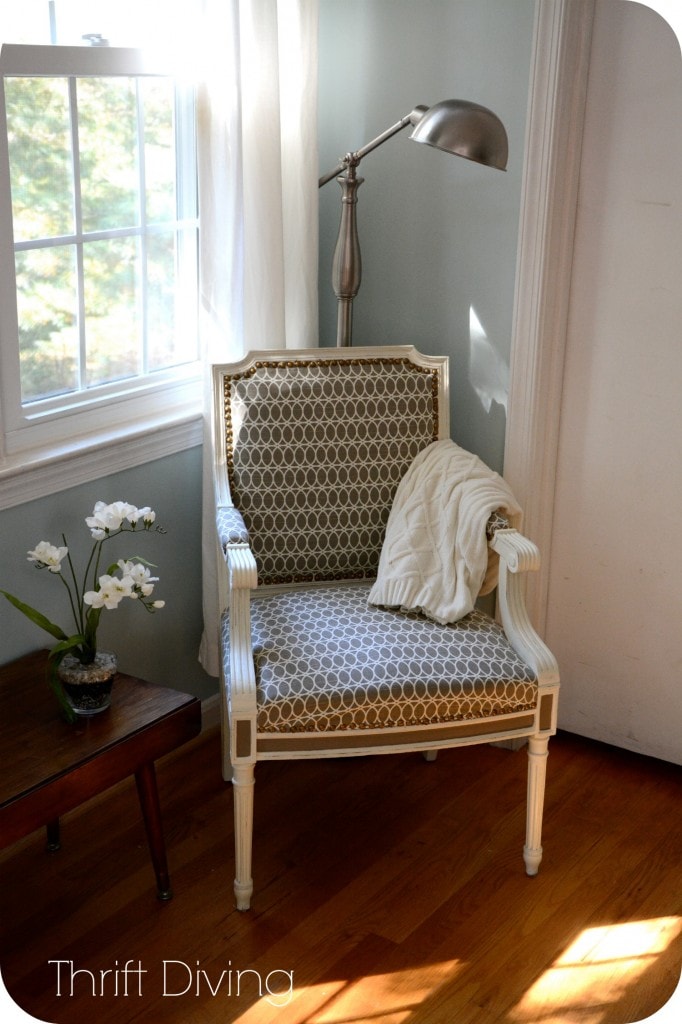
Serena from Thrift Diving has an amazing twofer (is that a real word?) for you! Not only will she share with you the paint project, but shares how to reupholster this chair in detail!

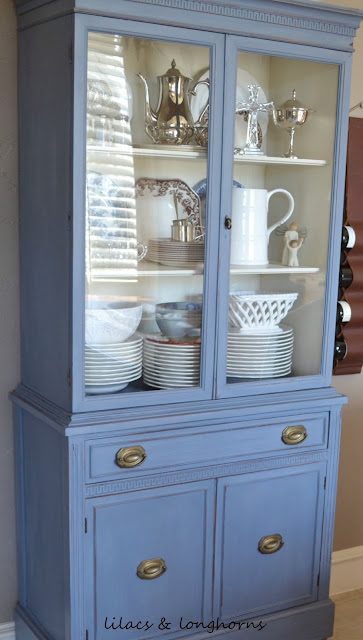
Last, but not least by any means is Julie from Lilacs and Longhorns. She transformed this Craig’s List find with Annie Sloan Chalk Paint AND added bun feet. Visit for the how-to.

I  encourage you to look around your home. Is there something that you are just bored with? Why not try your hand at paint! Scared or nervous? Practice on a yard sale or thrift store find first. You can even practice on scrap wood! 

I’d love for you to pin the individual projects…just visit the individual blogs from the links and pin directly from their project. It will make it much easier for you and others to find it down the road. 

blogsignature

Thanks so much for putting this together,  Christy!!  Each one is unique and inspiring!  I KNOW each one of my readers has enjoyed 15+ Painting Projects YOU Can Do with Christy!! 

Make it a Painted Saturday!!

Tickled Pink Times Two #14 and FeaturesI share little bits and pieces of my blog and life on: 

Pinterest Facebook Hometalk Google+ Stumble Upon Bloglovin’ twitter Instagram  
See you there!!
 

Where Am I Today??

August 7, 2013 By Meegan Leave a Comment

[slideshow_deploy id=’4254′]

Where am I today?  I am Guest Posting for my dear friend, Barbara at Chase The Star.  I hope you will enjoy the DIY Personalized Beach Art I am sharing today!  It came out even better than I pictured.  I love when that happens, don’t you?  Visit Barbara for a good look at the beach art soon!!

Where am I today?  I am visiting 24 Getting Creative At Home Blog Tours! I have had a blast visiting them all week long!

getting creative at home

Today’s Blog Tours are:

Wednesday, Aug. 7:

Bargain Hunting with Laurie
2 Little Superheroes
Stow and TellU
My Soulful Home
Glitter Glue and Paint
You won’t want to miss these tours!  It is the event of the Summer!
Where am I today?  I am getting ready for the Ultimate Tailgating Prize Pack Giveaway!!
tailgating_giveaway_graphic_small
That starts in just a few hours!  So come back soon for a chance to win over $375 in prizes!  Which includes a STOK portable gridiron grill, a 70 quart igloo roller cooler, Kyvan product pack (spices and delish sauces), AND a signed NFL t-shirt, 8×10 action photo and football from NFL pro, Reggie Kelly!!  I mean, really!  Who wouldn’t want to win that??
Come back in a few hours for a chance to win ALL of this!!  I am really hoping one of my readers wins!  Fingers crossed!!
So, that’s where I am today!!  Thanks for stopping by.  I hope you will visit Chase The Star to see my DIY Personalized Beach Art,  also visit the Getting Creative at Home Blog Tour, then come back here at 12 Noon Central time to enter the Ultimate Tailgating Prize Pack Giveaway!!
Woo!  It’s a busy day here at What Meegan Makes!!
Make it a wonderful Wednesday!  I will see you back here in just a few hours!!

signoff

Are you following me by email yet?  I would not want you to miss out on my posts.

I share little bits and pieces of my blog and life on:

Pinterest Facebook Hometalk Google + Stumble Upon Bloglovin’ twitter Instagram  Join me here soon.

Guest Post-Kristi from I Should Be Mopping The Floor

April 25, 2013 By Meegan 1 Comment

Hi, friends! I’m Kristi from the creative lifestyle blog, ishouldbemoppingthefloor.com.
I am so thankful to Meegan for inviting me over to guest post today.

Let me start out by saying that I can in no way take credit for being the creative genius behind this project. As most of you know, The Nester is the orignator of the posterboard Starburst mirror. I have put my own spin on it with my tutorial below. But, you can also find her tutorial here.

I’m really happy I ran across her tutorial…this was a quick & easy project with fantastic results. I love it when things come together like that.

Her mirror used a convex mirror in the middle…but, I couldn’t find anything like that in the size I was needing. So, I made my own mirror…which actually shaved a lot of the cost off of this project. I picked up everything at HobLob. I found the unfinished wooden circle {with already-routed edge} for $1.99, the package of mirrors {it came with two} for $2.99 {and used my 40% coupon on that item} and my five pieces of posterboard {only used four of them} for $.39 each. If you’re keeping track, I spent a total of $5.73 {pre-tax} out-of-pocket. That’s pretty CRAZY {in a good way} if you ask me!

Other items that I needed {but already had}: hot glue gun/glue sticks, paint for the wooden circle, scissors and a little alligator-tooth clip thingy to hang this off of {or you can use a soda tab, like I keep seeing on Pinterest}.

I started by using my {in}famous “oops” blue paint {that’s also used on my dining room drapes as well as that dresser that’s in my dining room….oh, and my kitchen island}.

Just like the Nester, I used a paper towel to make a template. It’s about a foot long…but the length didn’t matter…I only used the pointy part. The length was dictated by the width of my posterboards.

My particular width ended up being the size it was since it fit the back of that wooden piece {as pictured in the photo above this one}. I started by laying it out on my first poster board…I used it as the template to cut my strips. I messed up one piece of board because I folded it in half to try to make it easier…this just made it worse. It’s hard to put into words {that make sense outside of my head}, but trust me. It didn’t work.

To show you how it ended up shaking out, I created this little diagram that is to scale of a posterboard {standard size of 22″x28″} of how I cut each one. I got five strips out of each board. Before starting this project, I read through all the 172 comments the Nester got on this project…and I was a little amazed that one commenter had made this and needed twelve sheets of posterboard. I’m sure it turned out beautifully and is an incredible masterpiece…but I stuck with the four pieces recommended by the Nester.

The strips…ready for their points.

Fold each piece in half the long way. And…because I’m totally OCD, I used the handle of my scissors to apply pressure for an even smoother crease. The crease also adds tons of dimension to the final piece, so this is an important step.

I have a really long, boring story of how I lost a lot of friends in college due to my OCD folding requests. I about went postal on my event-planning committee for our club when they didn’t use their scissor handles to make perfect creases {which was clearly explained to them at invitation-folding orientation…helloooooo} in the 200 invitations we were putting together. It’s like I’m totally unreasonable or something. {Okay, maybe a little, but I digress}. If any club sisters are reading this, please don’t hate me for my OCD tendencies. It was all for the love of beautifully folded invitations.


Yeah. They were tri-folds, too. Ouch. 

—

Using the paper towel made previously {pictured several photos above}, fold it around the strips to cut your point. You can line the bottom flat edge of it up with the bottom edge of your strip. Then cut around the point. To be honest, I got a little annoyed with myself because I kept cutting into the paper towel {it was hard to avoid}…so I ended up using an already-cut pointed strip for my template from about the third strip on.

In total, I cut 24 strips {that’s how many I counted on the Nester’s project}…and that’s how many are pictured above. However, once I started gluing, I only used 20 of the 24. So I had four {from one of the longest sections} left over. Not sure where I missed four…maybe my final project {or maybe my mirror} was smaller than hers? It truly didn’t matter in the end. As you can see from the above pic {that I went a little overboard on with verbage}, two of the sets are slightly smaller than the others. I just sort of eye-balled this short-cutting part. Reaaaaal technical.

{I’m such an oxymoron sometimes: I go to great lengths for perfect creases but eye ball cuts? Weird.}

I started with my shorty strips {since they go on first}. I originally just did a bead of glue along the bottom…but then went back and filled in that whole area you see with glue. Since these are the base points, most of the other boards will be glued to these….so these need to stick. Really well.

Work in groups of four. And feel free to draw compass-like lines on the back of your board-circle-thing to make sure it all lines up. You’ll put them down in a compass-like layout.

These were the first four. After getting these on, it all went pretty fast. Just rotate to the next set of “compass lines” to glue the next set. After a few sets were on, I just started eyeballing {again}.

These are all of the strips glued onto the board {and to each other}. You can see the little hanging clip that I added before gluing all the strips down. Feel free to use a soda can tab if you don’t have one of these hangers on hand. You can also see The Nester’s post there on my computer! :)

After getting all of the strips glued on, I flipped it over and hot glued the mirror on the front {I just used one, but two actually come in the packages….if this one ever falls off and breaks, please remind me that I put the spare in the top right drawer of that dresser there. Please and thank you.}

And there you have it. I may have way over-complicated a rather simple project…but as I mentioned above, I’m OCD {and super type A}. Over-complicating is the only way I know how to do things. But, thanks for loving me anyway.

 YAY!

« Previous Page

Recent Posts

  • DIY Aqua and Red Christmas Wreath
  • Aqua and Red Christmas Tree Ideas
  • Decorating a Chandelier for Christmas
  • Crustless Broccoli Quiche Recipe
  • Homemade Bacon Gravy From Scratch

Purchase Beautiful Home Accessories for any style

Thrifty Style Team 2nd Friday Monthly

International Blogger Club-The 3rd Monday of Each Month

Fashion Trends for Over Fifty

DIY Bicycle Rim Halloween Wreath

Create and Decorate Pumpkins With Sea Shells

Fall Tablescape in Lavender and White

Vintage Bicycle Rim Wreath for Fall

How To Make a Faux Pumpkin Centerpiece

Glittery Welcome Embroidery Hoop Wreath

70+ Crafts and Decorating Tips for Fall

Top Ten Tips and Tricks for creating a Cottage Style Home

Pineapple Pecan Coffee Cake with Caramel Glaze

Raspberry Cream Sandwich Cookies

Cream Cheese and Shrimp Cocktail Dip

PERMISSIONS

What Meegan Makes and all it’s content, pictures, ideas, etc. are original ideas and copyright protected.

Using content including but not limited to: designs, original ideas, photos, posts, etc. is prohibited.

Please ask permission before using any content from my blog for any reason and if there is any question.

Search

FEATURED ON SHABBILICIOUS FRIDAY MAGAZINE

FEATURED IN EVERYTHING HOME MAGAZINE

FEATURED ON HUFFINGTON POST

FEATURED ON HUFFINGTON POST

MY OWN RECIPE WAS FEATURED

FEATURED ON GOOD HOUSEKEEPING

Designer Insights from Terry’s Fabrics

Copyright © 2025 ·Beautiful Pro Theme · Genesis Framework by StudioPress · WordPress · Log in