What Meegan Makes

vintage style, cottage living, home cooking

  • Home
  • Contact for Collaborations
  • Privacy Policy and Disclosure
  • Furniture Makeovers
  • 10 DIY Seasonal Banners
  • 15 Creative Spring Crafts

Succulent Tips and Care

February 26, 2013 By Meegan 6 Comments

Are you a gardener?  Can you grow plants easily?  Well, if you can, I am a little jealous!  I am not a good gardener.  I wish I was.  But I want to be.  Really, I do.  But, I have heard succulents are easy to grow,  Let’s see if I can follow my own rules for succulent tips and care.

I have tried growing succulents before and to no avail, I killed them, too.  BOO!  Now that is sad!Although, I think I will give succulents just one more try.  While visiting my mom, she gave me a whole succulent plant. I am a little worried, but like I said I just want to give it one more try.  My mom gave me a few tips of growing and caring for succulents.  I thought it would be fun to share them with you, too.
camping 2012 079
Doesn’t this look like just out of a magazine?  This is one way to grow your succulents inside.  They may not last longer than a month.  But think of it like fresh cut flowers, those don’t last long either.
Put some plastic in the bottom of your pot to keep it from leaking, then some rocks, then planting mix or a mix of dirt and sand.  Then if you want to put polished stones or something on top, before you put the plants in.  You could fill the pot all the way to the top with potting mix and/or soil sand mixture, if you want.
Just make sure the planting mix stays damp in the beginning and your plant gets some sun.

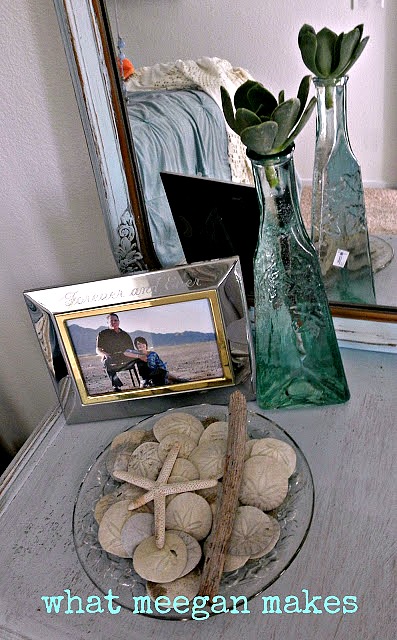
Another tip about succulents is that if a “blossom” breaks off, you can root them in water.  They will start growing a root-kind of just like an avocado seed does.  I decided to do just that with a few “blossoms” that broke off during our travelling.

camping1

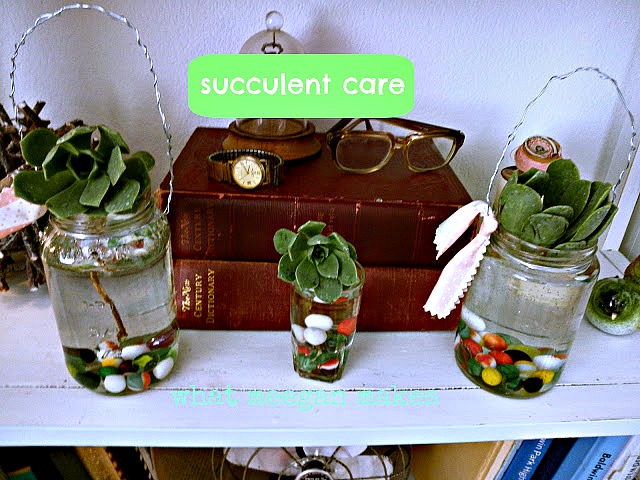
For this shelf, I decided to use 2 of my old jars as vessels.  I think they look pretty with hubby’s childhood marbles in the bottom.

Make sure the bottom of the “blossom” is in the water.   Check your vessel often to be sure the plant is reaching the water.  Also allow them get some natural light.

I added one to a green bottle for our bedroom.  The bottle is filled to the top with water.  And again, a sun lit area.

camping2

On the kitchen bar, my vessels are an old mason jar, an olive oil bottle and a small cup one of our daughters made in kindergarten.  Perfect sun light here, too.

camping3
For my last tip.  Did you know if the petals break off, you can place them in moist soil and they will begin to root?  Once again, just keep them in a moist soil with some light.  This pot is outside on my porch.
Wish me luck!!  I hope I can follow my own succulent tips and care!  let me know what is successful for you, too!!
Thanks for stopping by today.  I am so happy to have new followers all the time!  Make it a beautiful day!
{I posted this last Summer and thought it would be a good re-post since Spring is right around the corner!!}

I hope we can stay connected:

Pinterest Facebook Hometalk Google + Stumble Upon Bloglovin’ twitter Instagram


Make it a terrific Tuesday!!

Succulent Tips and Care

Linked with: Its Overflowing I Should Be Mopping Cowgirl Up Coastal Charm Kammy’s Korner Elizabeth & Co Alderberry Hill Shaken Together Home Stories A2Z 504 Main Lil Luna Savvy Southern Style From My Front Porch LiveLaughRowe House of Hepworths Whipperberry DIY Showoff Happy Hour Projects Ginger Snap Crafts No Minimalist Here White Lights On Wednesday 52 Mantels {Primp} Made In A Day Craftionary At The Picket Fence French Country Cottage The Dedicated House Creations By Kara Redoux Debbie Doos The DIY Dreamer My Uncommon Slice of Suburbia The 36th Avenue Funky Junk Becoming Martha Knock Our Socks Off

Changing Vintage To Work For You

February 21, 2013 By Meegan 27 Comments

Sometimes we inherit a piece of furniture or accessory that kinda doesn’t fit our taste or flavor. For me, I like the idea of changing vintage to work for you.  I love the pieces that I have, and I want to keep them, but still fit my motif.

That is what is SO great about paint!  Paint is my best friend lately.  It is fun to change up and turn something into what fits in your own space.  Woo!

I am REALLY lucky in the fact that I own quite a few pieces of furniture that were my grandparents.  This shelf is one of those pieces:

Changing Vintage To Work For You

As a child, I remember Grandma’s china, tea sets, and odds & ends sitting on this shelf in her dining room.  Then later in life, it hung in my Mom’s home holding tea sets, and beautiful plates.    I, on the other hand decided to hang it in our bedroom.  I have been trying to refresh the colors in our home to lighter and brighter tones.  So that meant this shelf needed some refreshing as well.


Changing Vintage To Work For You

I went to Home Depot to look for some paint and ended up at the “Ooops Table”  I found a can of Glidden flat whitish/creamish color for $1!!  I painted just about everything: Bookcases, my kitchen shelves, a lamp, a clock, and anything I could.  I mean for $1, how could I go wrong?  By the time I got around to painting this shelf, I had barely enough left to cover it.  But, it was just the right amount I wanted and needed.


Changing Vintage To Work For You

With a dry brush and scraping the whole can of paint, I came up with this look.  Prefect for some of our sand and shell collection, rather than china or tea sets.  The sand and shells go along with the rest of the motif in our home.


Changing Vintage To Work For You

I LOVE how you can still see the wood grain through the paint.  I also sanded the edges for a worn, vintage look.


On some of the bottles I placed tags labeling where we had gathered our sand and shells. I purchased the tags from Wal-Mart.  Using my stamps I created labels.  Easy!
Changing Vintage To Work For You
Doesn’t she look great?  Bringing in a touch of my family’s heritage and history,  along with things that I enjoy collecting.  Probably one of my favorite things to do-use vintage family pieces, then add my own style and taste.
What have you been working on lately? I have been moving furniture and painting-so I can share my “new” office with you very soon!!  Yay!!
Thanks for stopping by!!  I look forward to your visits and comments everyday.

Thanks for following me and I hope we can stay connected:

Pinterest Facebook Hometalk Google + Stumble Upon Bloglovin’ twitter And now I am on Instagram!!

Make it a Marvelous day!!
Changing vintage to Work for you
Linked with: Its Overflowing I Should Be Mopping Cowgirl Up Coastal Charm Kammy’s Korner Elizabeth & Co Alderberry Hill Shaken Together Home Stories A2Z 504 Main Lil Luna Savvy Southern Style From My Front Porch LiveLaughRowe House of Hepworths Freckled Laundry Whipperberry DIY Showoff Happy Hour Projects Ginger Snap Crafts No Minimalist Here White Lights On Wednesday 52 Mantels {Primp} Made In A Day Craftionary At The Picket Fence French Country Cottage The Dedicated House Creations By Kara Redoux Debbie Doos The DIY Dreamer My Uncommon Slice of Suburbia The 36th Avenue Funky Junk Becoming Martha

I’ve Got The Monday Blues

February 18, 2013 By Meegan 10 Comments

Hello Monday!  I’ve Got The Monday Blues.  And I would love to share them you you.  I think you will have the Monday Blues, too after seeing these beauties.

This creative blue is from my friend Gracie at Kitchen Table Art.

I've Got The Monday Blues

Gracie has a tiny kitchen.  So, she and her hubby made their own pantry with a bookshelf and a homemade screen door.

Continue Reading

Valentine Projects for $3 and under

February 9, 2013 By Meegan 7 Comments

Valentine’s Day is coming and I am always looking for ways to cut costs.  That is why I came up with my Valentine Projects for $3 and under…

Valentine Projects for $3 and under

Pin It

Valentine Projects for $3 and underMake a Valentine Marble Art piece.  The marbles are a $1 a bag at Dollar Tree.  You probably already have scrapbook paper and glue.  Frame it using a frame you already own.  So, there ya go. Cost $1

Valentine Projects for $3 and underDecorate your shelves or mantel with Valentine decor you already have.  Make a Valentine banner with ric rac and cardstock.  Super easy!!  Cost $.00

Valentine Projects for $3 and under

Use a frame you already have or buy one at a thrift store.  Paint it, add twine, ribbon, or ric rac.  Using a clothes pin, clip a Valentine sign to your frame!!  My cost $1.75.  The sign was a $1 and the frame was 75 cents.

Valentine Projects for $3 and underFill some jars with candy to match your Valentine Decor.  They don’t have to be heart jars. Tie ribbon, twine, or ric rac for an added touch.  Cost $2 for candy.  I had the jars already.

Valentine Projects $3 and underBuy some candlesticks, paint them your colors and tie them with some ric rac.  Cost $2.50.  I bought the candle sticks at the thriftstore.  I had the ric rac.  Easy Peasy!!

Valentine Projects for $3 and underDecorate some clothes pin with glue and glitter.  Super easy.  Cost $2.00 for glitter.

Valentine Projects for $3 and under

Cut out hearts from scrapbook paper.  They don’t have to be pink or red.  What ever you like.  Glue a white heart to your Valentine.  Using stamps write your message.  Cost $2.  $1 for stamps at Michaels Crafts.  $1 for scalloped scissors at Target Dollar Section.  Easy!!!

Valentine rojects for $3 and underMake a crepe paper rosette heart.  Backing is a cardboard piece from a cereal box, and the crepe paper was leftover from a party.  The ribbon was a remnent.  Cost $0.00

Valentine Projects for $3 and underUsing twine and your glittered clothes pins, make a banner to hang your homemade Valentines.  Cost $3.  $2 glitter. $1 scalloped scissors.

Valentine Projects for $3 and under

Using floral wire shape into Valentine hearts.   Use any color and as many as you want. Cost $1 at Dollar Tree.

There ya go!!  My ideas for Valentine’s projects $3 and under!!  I hope you have found some inspiration and ideas from visiting!!

Giveaway next week!!  I can hardly wait!!

Let’s keep connected:

Pinterest Facebook Hometalk Google + Stumble Upon Bloglovin’ twitter

And now I am on Instagram!!  woo woo!!

Make it a super day!!

Valentines Projects for $3 and under

 Linked with: Its Overflowing I Should Be Mopping Cowgirl Up Brassy Apple Coastal Charm Kammy’s Korner Elizabeth & Co Alderberry Hill Shaken Together Home Stories A2Z 504 Main Lil Luna Savvy Southern Style From My Front Porch All Stars Block PartyLiveLaughRowe House of Hepworths Freckled Laundry Whipperberry DIY Showoff Happy Hour Projects Ginger Snap Crafts No Minimalist Here White Lights On Wednesday 52 Mantels {Primp} Made In A Day Craftionary At The Picket Fence French Country Cottage The Dedicated House Creations By Kara Redoux Debbie Doos The DIY Dreamer My Uncommon Slice of Suburbia The 36th Avenue Funky Junk

« Previous Page
Next Page »

Recent Posts

  • Decorating a Chandelier for Christmas
  • Crustless Broccoli Quiche Recipe
  • Homemade Bacon Gravy From Scratch
  • All Things Apple
  • Handmade Sea Shell Garland

Purchase Beautiful Home Accessories for any style

Thrifty Style Team 2nd Friday Monthly

International Blogger Club-The 3rd Monday of Each Month

Fashion Trends for Over Fifty

DIY Bicycle Rim Halloween Wreath

Create and Decorate Pumpkins With Sea Shells

Fall Tablescape in Lavender and White

Vintage Bicycle Rim Wreath for Fall

How To Make a Faux Pumpkin Centerpiece

Glittery Welcome Embroidery Hoop Wreath

70+ Crafts and Decorating Tips for Fall

Top Ten Tips and Tricks for creating a Cottage Style Home

Pineapple Pecan Coffee Cake with Caramel Glaze

Raspberry Cream Sandwich Cookies

Cream Cheese and Shrimp Cocktail Dip

PERMISSIONS

What Meegan Makes and all it’s content, pictures, ideas, etc. are original ideas and copyright protected.

Using content including but not limited to: designs, original ideas, photos, posts, etc. is prohibited.

Please ask permission before using any content from my blog for any reason and if there is any question.

Search

FEATURED ON SHABBILICIOUS FRIDAY MAGAZINE

FEATURED IN EVERYTHING HOME MAGAZINE

FEATURED ON HUFFINGTON POST

FEATURED ON HUFFINGTON POST

MY OWN RECIPE WAS FEATURED

FEATURED ON GOOD HOUSEKEEPING

Designer Insights from Terry’s Fabrics

Copyright © 2025 ·Beautiful Pro Theme · Genesis Framework by StudioPress · WordPress · Log in