What Meegan Makes

vintage style, cottage living, home cooking

  • Home
  • Contact for Collaborations
  • Privacy Policy and Disclosure
  • Furniture Makeovers
  • 10 DIY Seasonal Banners
  • 15 Creative Spring Crafts

Cutting Burlap Without The Mess

September 26, 2012 By Meegan 17 Comments

Fall is in full bloom and that means decorating with burlap. I don’t know about you, but until recently thinking about cutting a piece of burlap has made me cringe.  Just thinking about the mess to clean up and all those little fibers everywhere-ugh! I want to show YOU a trick to Cutting Burlap Without The Mess.

Since I have been preparing for a wedding this coming Friday, I have needed burlap.  While I was purchasing the dreaded burlap, the girl cutting it showed me a tip to solve my burlap misery!!  I thought I should share it with you-a few of my burlap loving friends.

How To Cut Burlap in a Straight Line

It really is as easy as 1,2,3.

Here we go:

How to Cut Burlap the EASY way

Measure and decide the size of the piece you need.

How to Cut Burlap

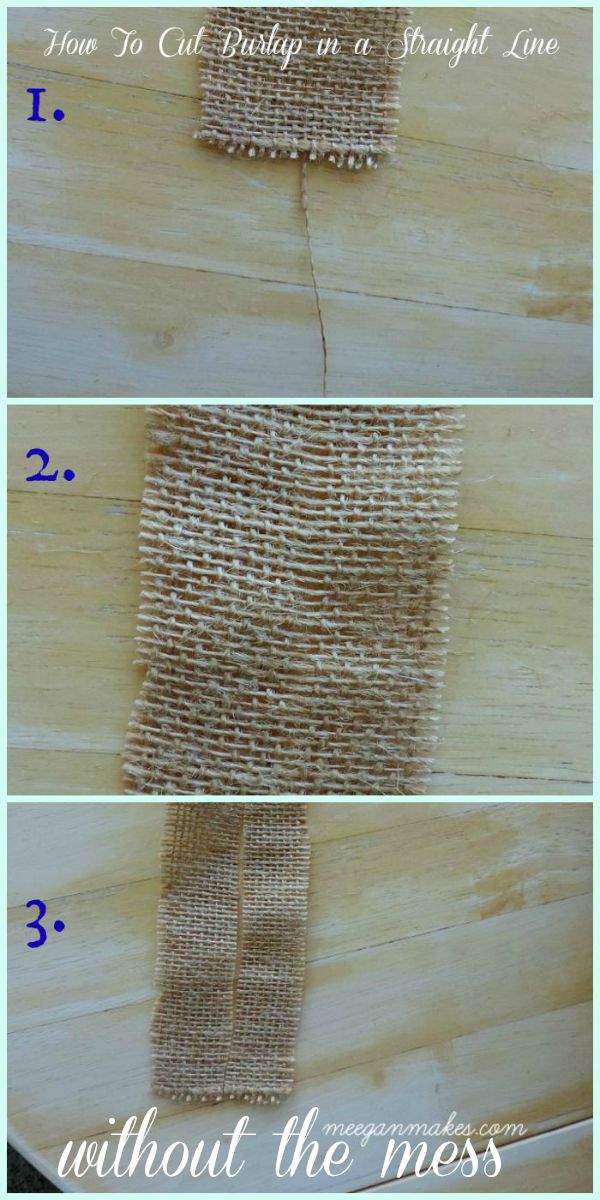
Start pulling a thread that will be just right for your measurements.

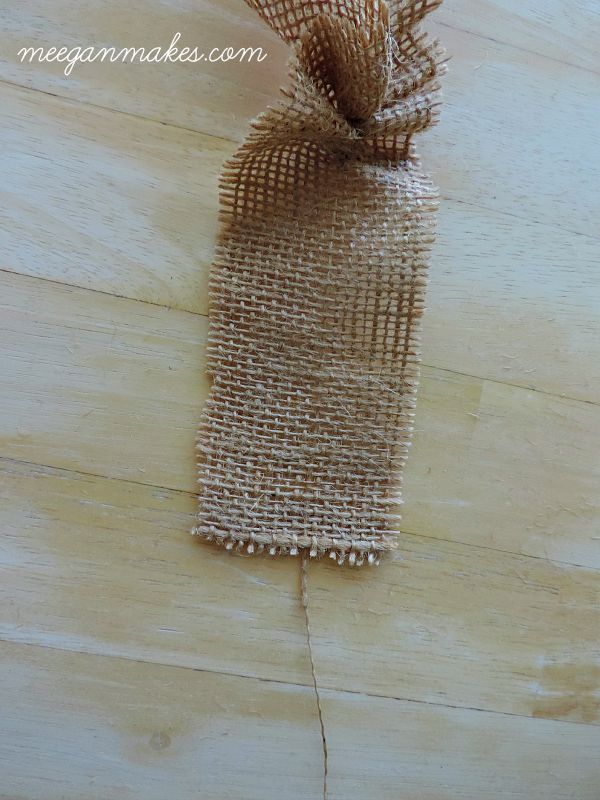
Keep pulling it though.  The burlap will gather.  Keep pulling it though.  Your thread might even break.  Just find the end and keep pulling.

Cutting Burlap


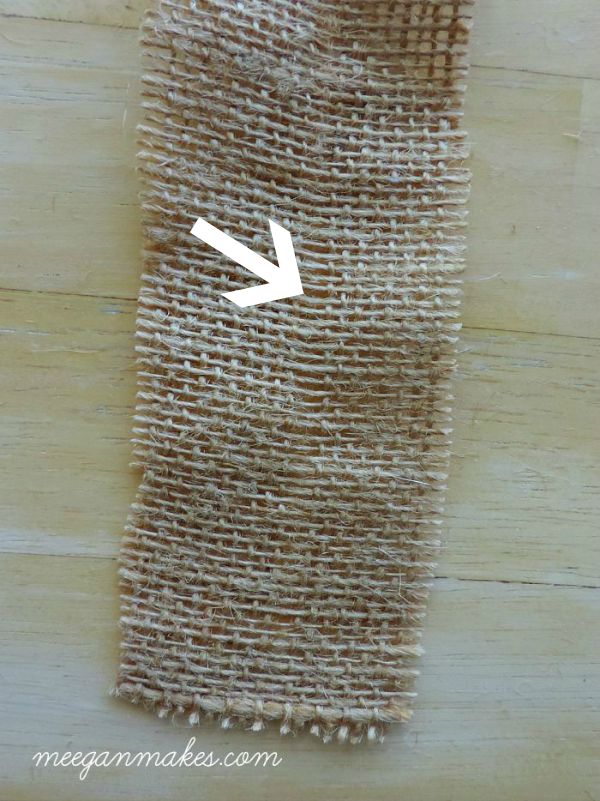
When you are done pulling your thread, this is what your burlap will look like.  You will have a space in-between the thread.

How To Cut Burlap For Crafts

This is your guideline as to where to cut for a straight, non-messy piece of burlap.

How To Cut Burlap in a Straight Line

Voila!!  Straight, no mess and ready for your decorating pleasure. 

Simple, huh?  I love this tip-it has cut my cleaning time to a minimum.  I hope you can use this tip while in the midst of all your Fall decorating. Actually-anytime.

Thanks for stopping by my blog today and letting me show you my tip for Cutting Burlap Without The Mess. I love having you here.

Make it a great day!

Meegan

I don’t want you to miss out on my latest posts. So make sure you sign up to receive my posts directly to your inbox.

Sharing bits and pieces of my life and creativity is always enjoyable.  
Why don’t you join me…
Periscope
Pinterest
Facebook 
Hometalk 
Google + 
Stumble Upon 
Bloglovin’ 
twitter
Instagram 

Filed Under: crafting, DIY Tagged With: burlap, crafting, DIY

Comments

  1. Anita @ Cedar HIll says

    September 26, 2012 at 2:36 PM

    Great tip, I’m going to try this next time. I’m posting this on the ranch’s FB page.

    Reply
  2. Debi @ Adorned From Above says

    September 26, 2012 at 2:48 PM

    Oh my gosh. Meegan. What a great tip. I am getting ready to cut burlap today, and I also have always heated the mess. Thanks so much for sharing this tip. If you haven’t already linked up, my link party is opened today until Sunday. I would love for you to share this.
    Have a great day.
    Debi @ Adorned From Above
    http://www.adornedfromabove.com

    Reply
  3. Linda@Coastal Charm says

    September 26, 2012 at 3:04 PM

    Thank You…Thank You…Thank You!!! I am so going to try this. Going to share this on Facebook.

    Blessings,
    Linda

    Reply
  4. Theresa @DearCreatives says

    September 26, 2012 at 3:17 PM

    simple & useful tip! thanks feel free to link up on the site anytime

    Reply
  5. Anna @ Bean Bug Crafts says

    September 26, 2012 at 5:26 PM

    Very helpful and perfect timing for my burlap project today! TFS Happy Wednesday :-)

    Reply
  6. Holly Lefevre says

    September 26, 2012 at 6:45 PM

    Brilliant. Never thought of it..but it makes perfect sense!

    Reply
  7. Shannon Fox says

    September 26, 2012 at 9:53 PM

    Pinned and tweeted this little GEM :)

    Reply
  8. Ira Morse says

    September 27, 2012 at 8:36 AM

    I having hard time of cutting burlap without a mess…but thanks for this informative post it is really a big help for me. Great tips!

    Reply
  9. JoAnn @ SweetPepperRose says

    September 28, 2012 at 11:48 PM

    THANK YOU!!! I love burlap but not so much the strings – thanks for the tip!!

    Reply
  10. Leslie stewart says

    September 29, 2012 at 1:20 AM

    Great tip! Thanks for sharing!
    Leslie
    House on the Way

    Reply
  11. Holly says

    September 30, 2012 at 10:54 PM

    Great tip. Thanks for sharing at the All Star Block Party.

    Reply
  12. Jessi @ Practically Functional says

    October 1, 2012 at 4:32 AM

    Brilliant, I love it! Thanks for sharing at The Fun In Functional!

    Reply
  13. Kathy, The Chicken Chick says

    October 3, 2012 at 3:15 AM

    Clever!! Hello, new follower here! I would love to have you link up with my Clever Chicks Blog Hop this week!
    https://www.the-chicken-chick.com/2012/09/clever-chicks-blog-hop-2-featured-post.html

    I hope to see you there!
    Cheers!
    Kathy
    The Chicken Chick

    Reply
    • Meegan says

      October 7, 2012 at 1:35 AM

      Kathy,
      Thanks for the invite and for stopping by! I hope you come back often!

      Reply
  14. Laura says

    August 24, 2013 at 7:27 PM

    Thanks for sharing! Wish I read this before cutting 2 yards of burlap into 6″ strips. After a shower I’m still itching! :) and what a cleanup!

    Reply
    • Meegan says

      August 26, 2013 at 11:20 PM

      I am glad you have this tip now, Laura! No more itching for you, right?? Come back again, ok??

      Reply

Trackbacks

  1. First Birthday: Happy Birthday Burlap Banner | thelittledabbler says:
    October 19, 2013 at 5:08 AM

    […] burlap was messy, so I decided to look up easy ways to cut it to avoid the infamous mess.  I found this blog post at What Meegan Makes that showed an easy way to do it.  Basically, you just need to measure where you want to cut. […]

    Reply

Leave a Reply Cancel reply

Your email address will not be published. Required fields are marked *

This site uses Akismet to reduce spam. Learn how your comment data is processed.

Follow on Bloglovin

Recent Posts

  • How To Embellish Christmas Ornaments
  • Handmade Bead and Crystal Christmas Ornaments
  • How To Decorate Pumpkins with Vintage Doilies
  • Peppermint Snowball Cookies
  • Decorate an Olive Bucket for Fall

Purchase Beautiful Home Accessories for any style

Thrifty Style Team 2nd Friday Monthly

International Blogger Club-The 3rd Monday of Each Month

MY AFFILIATES

Fashion Trends for Over Fifty

DIY Bicycle Rim Halloween Wreath

Create and Decorate Pumpkins With Sea Shells

Fall Tablescape in Lavender and White

Vintage Bicycle Rim Wreath for Fall

How To Make a Faux Pumpkin Centerpiece

Glittery Welcome Embroidery Hoop Wreath

70+ Crafts and Decorating Tips for Fall

Top Ten Tips and Tricks for creating a Cottage Style Home

Pineapple Pecan Coffee Cake with Caramel Glaze

Raspberry Cream Sandwich Cookies

Cream Cheese and Shrimp Cocktail Dip

PERMISSIONS

What Meegan Makes and all it’s content, pictures, ideas, etc. are original ideas and copyright protected.

Using content including but not limited to: designs, original ideas, photos, posts, etc. is prohibited.

Please ask permission before using any content from my blog for any reason and if there is any question.

Search

FEATURED ON SHABBILICIOUS FRIDAY MAGAZINE

FEATURED IN EVERYTHING HOME MAGAZINE

FEATURED ON HUFFINGTON POST

FEATURED ON HUFFINGTON POST

MY OWN RECIPE WAS FEATURED

FEATURED ON GOOD HOUSEKEEPING

Designer Insights from Terry’s Fabrics

Copyright © 2023 ·Beautiful Pro Theme · Genesis Framework by StudioPress · WordPress · Log in