What Meegan Makes

vintage style, cottage living, home cooking

  • Home
  • Contact
  • Privacy Policy and Disclosure
  • Furniture Makeovers
  • 10 DIY Seasonal Banners
  • 15 Creative Spring Crafts

How To Make a Moss Monogram

May 6, 2015 By Meegan 15 Comments

Happy Wednesday everyone! I am still in Washington DC, and headed home later today.  Yay!  But for now I want to show you how to make a moss monogram, the quick and easy way.

How To Make a Moss Monogram

I have had my eye on monograms for our home for a long time.  It had to be a certain font and I wanted it to have texture, like moss or jute.

Moss Monogram Supplies

I found the monogram at the 99 cent store.  I was so excited to be able to find an “f”.  They are usually all out of “Fs” everywhere, so I was really happy.  AND, for $1 how could I go wrong, right?

What you will need:

1-monogram, either card stock or wood

1-package preserved sheet moss

hot glue

hot glue sticks

scissors

Moss Monogram Step 2

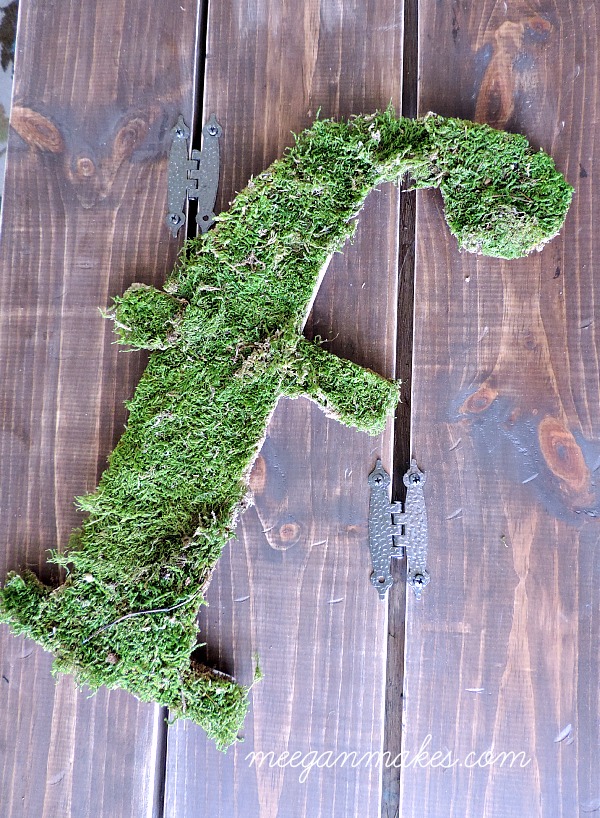
What I did first was lay the moss sheet on the monogram to ensure that I had enough moss to fill the letter. One package was plenty for my 2 foot monogram.

Moss Monogram Cut Off Excess

I carefully hot glued each piece of the moss sheet to the monogram. I pieced it together like you would a puzzle.

Moss Monogram Step 3

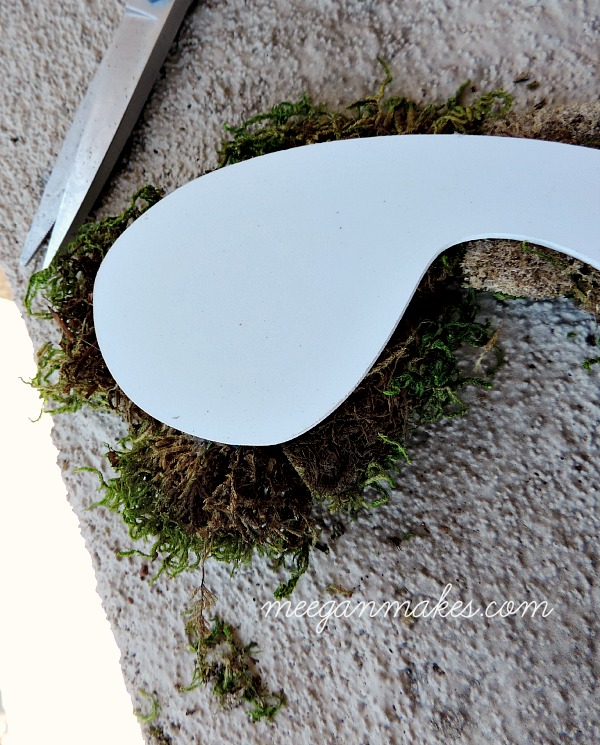
Once the moss was secure, I trimmed the moss sheet to the shape of the monogram. Easy, right?

It took a little time and it was VERY messy.  That is why I worked on it outside.

Moss Monogram

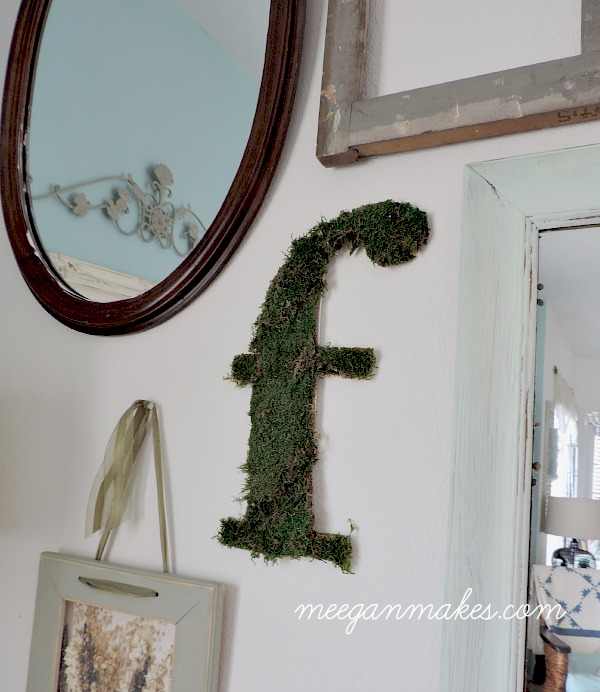
I am pleased with how my moss monogram turned out.  It is ideal for the gallery wall I have been working on in our living room.

Moss Monogram

I like how there are pieces and strings of moss kind of scraggily on the monogram.  You, of course could make your own scaled perfectly.  It is whatever YOU like that makes it perfect for you.

How To Make a Moss Monogram

I hope you have learned how to make a moss monogram today.  It is easy and not too costly.  I think I spent a little less than $5 for mine.

I hope you have a wonderful Wednesday filled with your own moss monogram…

Meegan

 I don’t want you to miss out on my latest posts. So make sure you sign up to receive my posts directly to your inbox.

This post is linked to fabulous parties here.

Filed Under: crafting, DIY, Home Tagged With: crafting, DIY, home

Comments

  1. Lisa says

    May 11, 2015 at 2:12 PM

    HI Meegan, I love your moss Monogram F and the spring look and feel it gives. I’m so glad you’re home and can catch up and relax. Thanks so much for taking time to come link up with us at our Something to Talk About Link Party. xo n have a great week, Lisa

    Reply
  2. dancers4life says

    May 13, 2015 at 9:02 AM

    Fun idea! Thanks for sharing!

    Reply
    • Meegan says

      May 16, 2015 at 10:08 PM

      Thank you so much! xoxo

      Reply
  3. Britni says

    May 13, 2015 at 9:39 AM

    This is awesome! Hope you enjoyed your trip to DC!

    Reply
    • Meegan says

      May 16, 2015 at 10:08 PM

      Thanks so much Britni. It was fabulous :)

      Reply
  4. marissa | rae gun ramblings says

    May 13, 2015 at 9:56 AM

    This is such a cute idea and way easier than I would have expected!

    Reply
    • Meegan says

      May 16, 2015 at 10:07 PM

      Thank you Marissa. You are very sweet.
      xoxo

      Reply
  5. kristi@ishouldbemoppingthefloor says

    May 13, 2015 at 9:59 AM

    So fun, Meegan! I’ve always wanted a moss-covered letter for my mantel. You made it look so easy. Beautiful, my friend!

    Reply
    • Meegan says

      May 16, 2015 at 10:06 PM

      Thanks Kristi! I can’t wait to see your version! Have a great weekend! xoxo

      Reply
  6. burlapandblue.com says

    May 13, 2015 at 10:29 AM

    BEAUTIFUL! This is so lovely. Thanks for sharing!

    Reply
    • Meegan says

      May 16, 2015 at 10:06 PM

      Thanks so much. I really appreciate that.
      xoxo

      Reply
  7. Larissa Prodigal Pieces says

    May 14, 2015 at 5:28 AM

    Love this project, Meegan!

    Reply
    • Meegan says

      May 16, 2015 at 10:04 PM

      Thanks so much Larissa! I take that as a very high compliment.

      Reply
  8. Katie Waltemeyer says

    May 15, 2015 at 1:32 PM

    I actually have all the materials to make this project happen; I’m getting to work! Thanks for a great tutorial!

    Reply
    • Meegan says

      May 16, 2015 at 10:03 PM

      Oh good, Katie. I can’t wait to see what you come up with :)

      Reply

Leave a Reply Cancel reply

Your email address will not be published. Required fields are marked *

This site uses Akismet to reduce spam. Learn how your comment data is processed.

Follow on Bloglovin

Recent Posts

  • How To Make Simple Resin Tags
  • Savory Spicy and Sweet Cream Cheese Dip
  • How To Refresh a Stand Mixer with Spray Paint
  • Spicy Mexican Chicken Soup and Taco or Burrito Filling Recipe
  • Top Ten Ideas for a Cottage Style Home

Beautiful Home Accessories for any style

Thrifty Style Team 2nd Friday Monthly

MY AFFILIATES

Fashion Trends for Over Fifty

Embellish Ornaments with Vintage Brooches or Pins

Vintage Bicycle Rim Christmas Wreath

Christmas Embroidery Hoop Wreath

Blue, White and Silver Christmas Décor

15 Thrifty Home Décor Projects Under $20

Pineapple Pecan Coffee Cake with Caramel Glaze

Christmas Surprise Cookies

Eggless Spice Cake with Brown Sugar Frosting

PERMISSIONS

What Meegan Makes and all it’s content, pictures, ideas, etc. are original ideas and copyright protected.

Using content including but not limited to: designs, original ideas, photos, posts, etc. is prohibited.

Please ask permission before using any content from my blog for any reason and if there is any question.

Search

FEATURED ON SHABBILICIOUS FRIDAY MAGAZINE

FEATURED IN EVERYTHING HOME MAGAZINE

FEATURED ON HUFFINGTON POST

FEATURED ON HUFFINGTON POST

MY OWN RECIPE WAS FEATURED

FEATURED ON GOOD HOUSEKEEPING

Copyright © 2021 ·Beautiful Pro Theme · Genesis Framework by StudioPress · WordPress · Log in